Categories
Recent Posts
Featured


I am starting a new build project (build projects are fun) to create a few different tactical emergency and special purpose communication repeaters, battery and power distribution, solar charging and much more. Below is a list of what I am in the process of building.
I am documenting each step and will put up videos of all of the builds as they are completed.
For all of the repeaters and hotspots we are using the Open Repeater Project's image so that single image can control all of the different modes that we are building.
Here is my quick notes page that I created so that I know what I am building towards.
ok, so let's walk through the drawing and do some explaining. Let's start with the solar panel in the top right, I have a few solar panels but for this project I have a 370 Watt Solar Panel, if you know much about solar panels then you will know how big this panel is. Probably overkill for a simple repeater but i will explain more in a bit why I went so big.
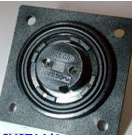
The solar panel will feed into a battery box. Before I go into details about the battery box, I am using Marine Grade DC connectors that are sealed when you connect them so they are weatherproof. Here is what they look like:

ok, so back to the battery box. My goal is to have 100 Amp hours in an easily portable case. I have a large 100 Amp hour battery and it is very very heavy. I also have a 20 Amp hour scooter battery. I am trying to decide if I go with 5 20 Amp Hour batteries or one big one. Either way, it is going to weigh a lot. Besides the battery or batteries as it might end up, this box will have a solar charge controller that will take in power from the Solar Panel and manage the charging of the battery.
Out of the battery box will be 3 weather proof plugs that can feed 12 volts to up to 3 other locations. In addition to the 3 output power plugs, the panel on the inside of the battery box will have access to the charge controller, lighter power plugs to plug in electronics that you use in your car, Anderson Power Poles and USB power for charge devices like iPad and Cell Phones. And of course the always handy twist poles like you see on so many power suplies, unscrew, stick in a wire and tighten and you are up and going.
There is a voltage meter inside on the panel so that you can always see the status of the batteries. An on/off switch that turns off and on the internal power ports and voltage meter. Here are some pictures of the quad panel and the Anderson Power Poles I am using inside the battery box:


Ok, so let's look at the features I want to build into the repeater. And, I will say this up front, I will probably end up building more than one of these and maybe even a more powerful version as well.
I have decided to start out using the Leiken 10w radios because they are small and they are cheap. One of these radios was my first mobile radio when I got back in to radio after a long break. It still works just fine too. They also make a 25 watt version that has the same form factor.
The repeater box will have in it, 2 radios (TX and RX), an Open Repeater Project controller, a duplexer for the main designated frequency for this repeater, an antenna switch that allows the duplexer to be bypassed and the same Quad panel that is used in the battery box. I also hope to add a small speaker and volume control.
The duplexer can really only handle one frequency really well and I see this repeater being useful in one of 3 ways: As an emergency or event repeater for Ham Radio, as a GMRS repeater or as an event repeater but not used by ham radio operators but on one of my Iterant frequencies. The frequencies on all 3 of these are different enough that a duplexer cannot be tuned to support all 3.
So the option was, put in 3 duplexers and 2 1x4 antenna switches or one duplexer and 2 1x2 antenna switches. For now I am looking at just one duplexer per repeater box, I may in the future look at building one that can do all 3. This is also why I am thinking about building 3 different ones.
So why the antenna switch, well... Let's say you do not want to use the frequency that the duplexer is tuned for. The switch allows you to bypass the duplexer and go around it. Because of this, there are 3 antenna connectors on the outside, If you are using the duplexer then you only need one antenna and you use the duplexer RF connection. If you are bypassing the duplexer, there is an RF connection for the input antenna and the output antenna. You just need to make sure that these antennas are at least 16 ft apart and preferably the receive antenna is mounted higher than the transmit.
For power, there are 2 power connectors, so you can have an in and an out so this can be daisy chained with other devices.
I decided to build a power distro box. Afterall, there are many uses for a solar charged battery pack besides just running a repeater. Of course the most fun is powering your radios. Those radios however do not need to be repeaters. A great example is the biggest day all year for radio enthusiasts in the US. Field Day. The idea of the power distro box is it can be inline and allow you to connect to power in multiple ways. The concept is very similar to how the battery box works.
The box will have 2 lighter plugs, 2 USB charging ports and 2 Anderson Power Pole plugs and will also have a voltage meter on it so you can see the battery status from this location. it will also have 8 pairs of screw power poles for connecting up wires.
I have already designed the panel for this box and 3D printed the panel, I am not sure if the 3D print is going to be strong enough yet, if not, I will have to have a metal panel created for this box as well.
Here is a picture of the tri panel that holds the voltage display, lighter and usb power, the Lighter and Anderson Power Poles are added below this panel in single form.

Of any part of this build, this is by far the easiest. It is getting a box, cutting our some foam and putting in radios. This part of the build is done. Basically it is a ruggedized box with 16 slots to hold the 16 radios and 16 programmed and charged radios ready to go.
Each radio is programmed for the 2 experimental 70cm frequencies in our area, all of my Iterant frequencies that I am licensed for and all of the GMRS frequencies. I am using 16 Baofeng UV-82L radios. i know, some of you are saying a cheap Chinese radio. Yep, I experimented with different ones, these work very well, are 5 watts and if one gets lost or broken I am out less than $30. All 16 radios costs a total of less than $500.
So I now have 16 radios in a case, what if they were needed in a real emergency and needed for longer than a day, how would you charge all of them? And what if solar was the only power that was available, then what? So when I got 16 radios they came with 16 bases for charging. The radio charge case will have all of the chargers mounted in them and a weatherproof connector so it can be connected to the battery case.
The base for charging is larger than the radio so it will take more than one case to hold all of the chargers. These are smaller boxes and can be plugged in the same power chain or directly into the battery box.
The Micro Repeater is a ruggedized temporary repeater. It can be used for all the same activities as the repeater above. The big difference is that this repeater uses 2 hand held radios and only uses power from the batteries of those radios.
Trying to stick to the low cost, they are both Baofeng radios, however the transmit radio is an 8 watt radio. Also, instead of using the Open Repeater Project controller, it is using a Handytone controller that just does basic control, no announcements, etc.
Using the batteries of the radio and the HandyTone, this repeater can run for up to about 30 hours. Also technically, the HandyTone allows this to be a 2 way repeater allowing for it to also be a cross band repeater.
This repeater is in a very small ruggedized and weatherproof box. It has 2 external SMA antenna adapters, on on top of the box (handle is the top) and on one the bottom. The top one is the receive antenna and the bottom on is the transmit antenna.
The idea is to turn on the repeater and throw a rope over a branch and hoist it up. Perfect for a quick repeater or to add some overage where there is little (using cross band repeat).
This build is complete and here are some pictures of the completed box:
This was my first ruggedized build. I actually have 3 D-Star hotspots running, one is a high power (currently at 25 watts), one is a low power and is attached to the same raspberry pi that the high power hotspot is connected to, we were using it to test 2 simultaneous D-Star radios on the Open Repeater Project build.
My 3rd is built into a ruggedized case with a 12 Ah battery and a solar charge controller. However, it is rare that I hook it up to a solar panel, I normally just feed it either 12 volts from my car lighter or plug it into a 19 volt DC power adapter.
When I travel or know I am going into an area where there is no d-star, I throw it in the car and plug it into the aux power port in my trunk area. It also has space for my AT&T Hotspot and will charge it as well. You will also see that I can hook up my external cellular antenna to the box so the Hotspot from AT&T has the best coverage as possible.
The great thing about the Jonathan Naylor software we using in the Open Repeater Project is you can do everything from the radio just like with D-star from the repeater, so you do not need to see a screen. In fact, I bet this raspberry pi has not been rebooted in months.
Here are some pictures of the D-Star Hotspot:
I am well on my way on this build as well. I already have the unit configured and working, the battery installed and the holes drilled. I received just yesterday the Solar Charge Controller that is going to go into this unit so that is not mounted yet or hooked up.
The other important piece that is still needed is the touch screen. The DV4Mini unlike the D-star hotspot requires you to select the mode, rooms or talk group etc. I did add some weatherproof USB ports to the outside of the case so that a mouse and keyboard can be hooked up (or a small wireless keyboard/mouse combo can be used). I ordered a 7 inch touch screen for the raspberry pi but it has not arrived yet. I will have to 3D print an enclosure to hold the monitor and attach it to the outside cover of the case.
This will make it not very weather resistant or even durable because of the screen.
Here are some pictures of the current state of the build (you will notice I am running it off of a Anker battery power supply for now (2 days and still going):
I will continue to update this page as the project progresses. So check back often.
My goal is to have the batter pack and power distro done for Field Day 2016 so we can get some points for doing it with Solar Power.
I also am starting to work on building a Go Kit that I want to have done for Field Day as well. It will be in 2 pieces, one smaller one for the HF radio and a larger one for the VHF/UHF, power management, etc. So keep an eye out for that project build.